 Pubget is a command-line tool to download articles from PubMed Central, extract their content and prepare it for analysis.
pubget run --query "MRI[Abstract]" ./pubget_data Labelbuddy is a desktop application for labelling text. It is a simple, easily installed local application.
 Labelbuddy-annotations is a repository of annotations created with labelbuddy, on documents collected with pubget.
The biomedical literature comprises millions of articles and is expanding quickly. Due to this overwhelming size, using it efficiently often involves systematic or automated methods, collectively known as text-mining. A text-mining project involves several steps: finding relevant articles, downloading them, extracting their text, extracting information from the text and finally running the main analysis which yields scientific insights. More often than not, the first steps of this process – data collection and curation – take a frustrating amount of time and effort, and are performed in a way that is difficult to reproduce or extend later.
Here, we describe useful tools and a simple workflow that make text-mining of the biomedical literature easier, more transparent and more fun. We hope to help you streamline the first tedious steps of your text-mining project and focus on the part you care about: extracting and analyzing high-quality information from text, rather than downloading, parsing and pre-processing thousands of articles.
Here is an overview of our suggested workflow, along with the tools we offer and possible places to store the output of each step.
- Pubget downloads articles from PubMed Central and extracts their content.
- The corpora created by pubget can be stored in a dedicated OSF project.
- Labelbuddy can be used to manually annotate papers.
- The labelbuddy-annotations repository is a place to store, share, and analyze annotations.
- Pubget and pubextract can automatically extract some information from articles.
- For dedicated information extraction and for analysis, each project can have its own code (“custom code”), which can be tracked and shared in its own repository on GitHub or elsewhere (“GitHub repo”).
Pubget
Pubget is a command-line program to obtain and process full-text articles from PubMed Central (PMC). For example, here is how we would obtain all the articles that mention “zika” in their abstract:
pubget run -q "zika[Abstract]" ./pubget_data
The pubget documentation provides a detailed description of all the options and outputs, and pubget --help produces a summary.
After downloading all the articles, pubget extracts their content, including the text, abstract, metadata fields such as keywords and publication date, etc.
This data is stored in CSV files that are easily loaded to analyze all the articles jointly.
pubget also has some features specific to meta-analysis of neuroimaging studies, such as the extraction of stereotactic coordinates.
Labelbuddy
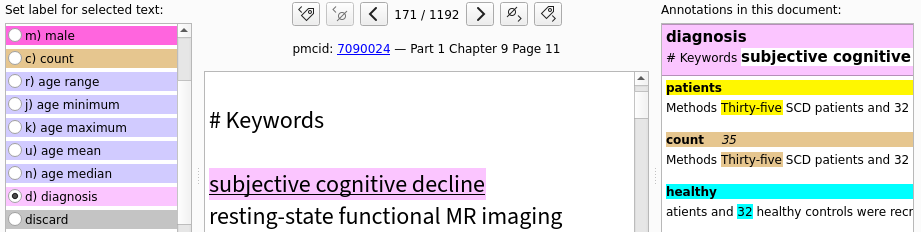
In a text-mining project, we often need some manual annotations. For example, if we create a method for automatically extracting information from the text, we need labelled documents at least for validation (evaluating how well the automatic extraction performs). Labelbuddy is a simple, effective and flexible tool for performing this task.
Conveniently, pubget can generate JSON files containing the text it downloaded, simply by adding the --labelbuddy flag to the pubget command.
Therefore, we can start annotating our articles very easily.
For more details about labelbuddy, see its documentation.
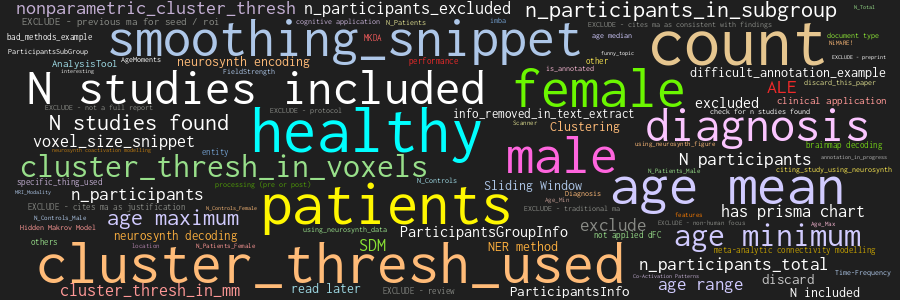
The labelbuddy-annotations repository
If you annotate biomedical text with labelbuddy, we encourage you to share the annotations in this repository. This will facilitate re-use of annotations in different analyses, and collaboration across projects (eg different projects annotating the same articles with different types of information). As a bonus, you get a few utilities to work with the annotations, and you can showcase your project in the repository’s documentation.
Workflow
Data collection, labelling and cleaning tend to be messy. Still, we want the process to be as streamlined, transparent and reproducible as possible. Here is an overview of the organization we suggest; more technical details are provided in the labelbuddy-annotations repository’s documentation.
Define a query
Visit PubMed Central to help you choose the query (search terms) you will use to select which articles to download.
You can follow the “Advanced” link to build a query with an advanced search dialogue.
Once you are satisfied with the results returned, copy the query that appears in the search bar or in the “Search details” box on the right and write it in a text file, say query.txt.
Download & process articles with pubget
Now you have your query you can download all the corresponding articles with pubget using the --query_file option (or the shorter version -f).
You must also specify the directory in which pubget will store all its data; here we use pubget_data.
Finally, we pass the --labelbuddy option to tell pubget to generate JSON files that we can later import into labelbuddy.
pubget run --labelbuddy -f ./query.txt ./pubget_data/
There are several other useful options, such as --n_jobs to run the content extraction in parallel or --alias to create a symbolic link with a human-readable name to the directory pubget will create for our query:
pubget run --labelbuddy --n_jobs 4 --alias "my_project" -f ./query.txt ./pubget_data/
The pubget documentation provides a detailed description of all the options and outputs, and pubget --help produces a summary.
Store the full pubget output online
Pubget will create a directory containing all the articles that match your query on PMC, the text and information it extracted, and the labelbuddy files.
To make sure you keep and are able to share all relevant data for your project, we recommend creating a (.tar.gz) archive from this directory and uploading it to an online platform such as OSF (“Open Science Framework”).
Manually annotate some documents
Most likely, your project will involve some kind of information extraction – for example you may need to extract information about the study’s participants, drug or disease names, etc. A wide range of techniques and tools are at your disposal, and at this point you are getting to the interesting part of your project. But regardless of the approach you choose, you will need to verify that it produces satisfying results on your corpus of text. The most common way of assessing this is to compare its output to “ground truth” labels from a human expert (probably yourself). Also, if the information you are looking for is difficult to extract automatically and if your corpus is small, you might rely fully on manual labelling instead of using automated methods.
Fortunately, labelling the documents we just downloaded will be very easy.
Pubget created a subdirectory called subset_allArticles_labelbuddyData, which contains files named documents_00001.jsonl, documents_00002.jsonl etc.
Each of these files can be imported into labelbuddy and contains a batch of 200 articles.
Inside that directory, create a labelbuddy database for your project and import a first batch of articles.
This can be done from labelbuddy’s graphical interface or with the following command:
# create database and import documents
labelbuddy myproject.labelbuddy --import-docs ./documents_00001.jsonl
# launch labelbuddy
labelbuddy myproject.labelbuddy
Now you can create some labels and start annotating documents. You can refer to labelbuddy’s documentation (also available through the “Help” menu in labelbuddy).
Once you have annotated some documents, export the annotations to a JSON file (either from the “Import & Export menu” or with the labelbuddy export-docs command) .
This will allow you to track the annotations in Git, but also to easily read them with tools such as Python or R for your analyses.
Consider adding a project to the labelbuddy-annotations repository
We encourage you to share any annotations you create in the labelbuddy-annotations repository.
To do so, you simply need to fork the repository, and add a subdirectory in projects in which you store the labelbuddy file you are annotating, the labels you created in labelbuddy and your annotations.
The repository’s
documentation
provides all the details to get started.
Adding your annotations to this repository has several advantages. It makes your annotations visible online, easy to re-use and combine with other projects. The repository also contains some utilities to work with the annotations. For example, it can compile a CSV file that combines all the annotations from all projects, along with information about the articles. See the documentation on using the repository for details.
Use your text corpus and manual annotations for analysis
Now you have your text corpus and your manual annotations in convenient formats, ready to load with your favorite scientific tools and analyze. The real work can begin!